Learning to draw a grew can be a very satisfying and calming experience because it is both challenging and enjoyable. Whether you are a budding musician or an utter beginner, my stage- by- step guide will have you safely sketching roses, playing with composition and building a piece of artwork bursting with the vivid colours of the English Rose.
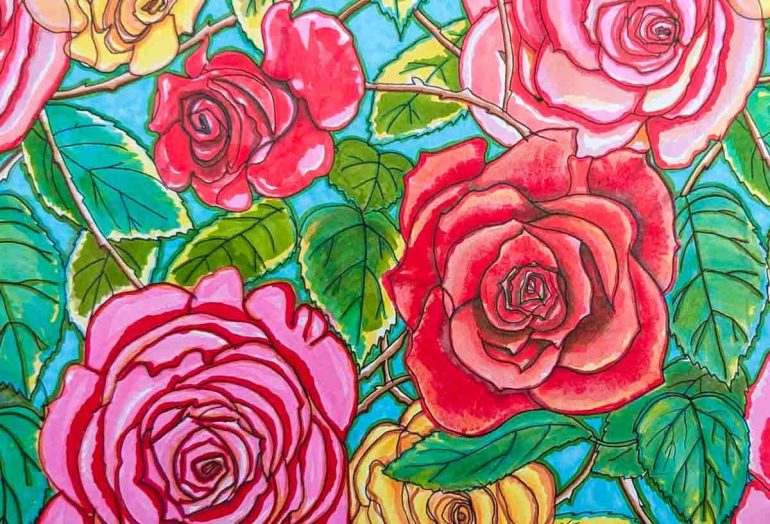
As I write this, our garden’s rosebushes are in full bloom. The most impressive of which, the walking rose, brings an ample music of rich rose dark against the natural foliage and yard trellis.
I grabbed my lens and took some close up pictures of their lavish pieces of flowers because I wanted to capture their beauty before they go through.
I love the construction of the roses and the way that their flowers sit securely wrapped around one another in the middle, gradually bursting inwards with a rushed overlap. Roses are a delight to any British garden.
Social Wellness Walks
Discover All Walks That Are Possible.
From the Middle Ages and until provide the rose has been commonly used to express love and beauty in Art and Literature. Throughout the second half of the 19th and early 20th centuries, rose were frequently depicted in canvases by the Pre-Raphaelite, Aesthetic, and Symbolist painting.
The rose continues to be the ultimate symbol of love and need in common culture and society. The rose photograph is a widely recognized, instantly recognisable, business, and much loved image, from material designers to scar artists, oil painters to photographers.
I love to bring rose. In truth, I find drawing their sweet, shapely petal shapes, thorny, knotted stems, deep green leaves, and stunning, layered centers to be the most conscious and calming.
That is not to suggest that depicting a rose in pencil, color or another Art Material is hardly challenging. It is difficult to capture the rose’s special shape, clean, intricate form, and sympathetic shade, giving it true life and depth.
The very best way to start drawing a rose has to be from lifestyle, sat with a notebook and pencil in the yard, enjoying their sweet flavor and three geometric form.
However, I have put together this step-by-step method that I used to make the rose featured in the design at the top of this article to help you start your quest of using grew pictures in your skill training.
We will work from a picture of a rose taken in my yard and I will take you right through from drawing the construction of the rose in pencil right through to adding rich pieces of beautiful color to add depth and voice to your job.
Art Supplies You Will Need To Draw A Rose
A sharpened HB pencil and a sharpener or a propelling pencil with 0.7mm HB leads
A Windsor and Newton medium kneaded Putty Rubber or a Derwent Art Eraser of high quality soft eraser is required.
Art Paper– you can draw a rose on anything you choose, from a scrap of paper to a high quality watercolour or multi use Art paper.
How you want to add shading or color ( paint, colored pencil, ink, or pastel ) to your drawing will determine how thick ( weight of paper in grams ) you want to use.
The Paper – I recommend using Art paper that is above 150 gsm. There are many papers available from Winsor and Newton. I used their heavyweight bleed proof marker paper and I love it.
Learning About The Fundamental Shapes of a Rose:
Before you head into representing the intricate details of drawing a rose on your paper, it is essential to understand the basic shapes that form the foundation of this stunning and somewhat iconic flower.
A rose can be divided into several easy geometric shapes, including ovals, circles, and triangles of various sizes. Practising drawing these shapes initially will help ease you into sketching the overall structure of the flower.
Before beginning your exploration of a rose’s detail, you can establish a strong foundation for your drawing and ensure precise placement and proportions.
A great way to start is to visualise the rose as a series of concentric circles, with the smallest at the centre representing the bud and the outer circles symbolising the layers of petals unfolding around it.
Take a few moments to really examine the arrangement of the petals, how they softly wrap one around the other in a layered, staggered pattern.
How To Draw A Rose
Decide A Size
Decide how large you would like to draw your rose. The size of your rose drawing will depend on whether you choose a circular object to draw around or use a compass to create the outer circle. Next draw two ellipse shapes that overlap one another and cross the centre of your rose. These will aid in forming the rose’s axis, which runs from its center to its outer petals.
Sketch The Circular Form
Use simple, gestural lines to loosely sketch the circular shape at the rose center’s outer edge. This will be an organic circle shape that gently moves in and out and sits inside the rectangular shape that has been formed by the two ellipses crossing over one another.
Draw the outer shape
Next, create another undulating circular shape using the outer circle as your guide on size and also work inside the petal shapes formed by the two ellipses crossing.
Create The Spiral Center
Now that you have outlined the basic circular shape of the rose, you can begin to form a spiral shape that radiates outwards from the very centre. If you use an angular formation, this spiral looks effective ( I have included a small diagram in the top right for you to copy and practice ).
Create The Petals
Pay attention to the petals ‘ curvature and overlap as well as the various sizes and shapes that go into the rose’s distinctive spiral pattern as you work from the center outward. By breaking down the complex structure of a rose into simple shapes, you can build a solid foundation for your drawing and ensure a realistic depiction of this intricate flower. Take note of the petal shapes I have listed as 1, 2, and 3 in this example.
Adding Extra Shapes
Include petals with serrated edges and angular tips in your photo if you look closely at it. Create subtle curves, elongated ovals that vary in size and shape as you add more layers of petals. to mimic the organic growth and symmetry of a real rose, depending on the size and shape of each petal.
Creating Balance
As you work from the center outwards, gradually rearranging the shape and arrangement of each petal, continue to build up layers of petals. Focus on capturing the subtle curves of the rose as you go. Please take note that I have listed each individual petal shape in order to help you recognize their unique form and shape. Try to pay attention to the direction and angle of each petal, as well as the spacing between them to create a balanced and harmonious composition.
Focus On Dimension and Depth
As your drawing of the rose progresses, step back and assess your drawing from a distance every now and again. Make sure the composition and overall balance are as accurate and accurate as possible. Make any necessary adjustments to the shape or position of the petals. In your drawing, make the contours and edges more precise so that there is more depth and dimension. Remember that drawing is a process of refinement, so do n’t be afraid to experiment and make changes as you work towards capturing the beauty of a stunning rose.
I used a black fine line rollerball to go over my rose’s main lines. If you do this too, remember to let the ink dry before rubbing out any guidance lines you have used.
You now have the ability to create rose drawings. Now to take it further.
adding color, shade, or tone to your rose
Now I will show you how to add vibrant colour, shading and tone to your rose using Winsor and Newton Promakers. When creating floral designs, I enjoy using these simple and effective pens because they give your artwork a professional and painterly effect. Promakers are available in such a vast array of colours that are easy to blend with one another and I love the fact that you can add colour rapidly to your work.
Here are some options for artistic materials:
Winsor and Newton Pro- Markers
Winsor and Newton inks
Paint – choose from Goache, Acrylic, Watercolour and Oil paints.
Your choice will depend on your personal preferences and background. In this example I have used Promarkers.
Additionally, a combination of several different media could be employed. This can be a really lovely thing to do, using different media as you work allows you to change both the colour and the surface texture of your work.
There are no rules to art, so follow your heart, and you’ll discover beautiful things.
When we work with lots of different media on one piece of work, we call this a Mixed media piece. For instance, you might choose to shade the roses ‘ heads with Promarkers, or you might choose to use coloured pencils or paint to recreate the textures of the leaves, stems, thorns, and background.
How To Add Details and Shading to your Rose
Take some time to study the photo you are working with before adding shading to your rose. Pay attention to the subtle variations in light and shadow that give the rose its three-dimensional appearance.
Look closely at the petals studying how the light hits their soft, smooth surface creating highlights and how deep shadows are formed between the petals.
Notice the rich, shadowy tones of the petals at the center of the rose in a spiral arrangement. Dark shadows are particularly strong when we look at a deep red rose such as the one in the photograph that I worked from.
You can gradually build layers of color over time while working from your work, adding shadows and tone, and occasionally removing them from your pages to give the rose its volume and shape.
In the following photographs, I show you in simple steps how to gradually build layers of colour, texture, shade and tone smoothly. My photos were taken using Windsor and Newton Promarkers, one of my favorite media, to slowly add tone and shade.
As you start to add shading to your rose, keep looking closely at the texture and surface quality of the petals. This can range from velvety smooth to rough and veined.
Promarkers are wonderful to work with and are particularly effective for creating the subtle textures and patterns found in a real rose. Their wider chisel tip end is ideal for creating larger, soft areas of color, and their bullet end is ideal for adding thin lines of color along the outer edges of the petals.
Choose the lightest colour you can idenify on your rose ( I chose mustard ) and use the chisel tip of your Promarker to create marks that follow the curve of the rose petals. Start at the center of the petals and flex your pen against the petal edge, bending your way along the way.
Keep adding curved tone to your petals until each petal has colour, remembering to leave some white highlights.
Working from the center of each petal, using your chisel tip end, work in curved lines that softly overlap one another ( I used the Ginger Promarker ), pay attention to where the darkest and most saturated areas of the rose begin and end, and leave some white areas to give more highlights and gradual tone.
Have a little test area for colours next to your work, try each colour that you use on top of one another and practise the strokes you make with your pen. I enjoyed using Rose Pink and lipstick Pink, gradually layering color on top of the ginger and mustard, keeping an eye on the petals ‘ curve and constructing the richest areas of color.
Using a much deeper tone now ( Lipstick Red ) start to outline each petal. Use the bullet tip to form a finer series of lines that curve over the top of the petals, from their center edge outwards, stopping short of their tips. Use this deep colour to add to the rich, shadowy centre of your rose. Proceed with caution, keep taking a step back from your drawing and going over your photo or real rose, making sure not to go in too dark or muddy the tones.
Select a vibrant colour with a rich, deep tone ( I went for Turquoise ) Using the bullet tip of your pen, identify the darkest areas of your rose, from its delicate, tightly wrapped spiral centre, to the areas of the petals that tuck tightly in towards its centre. Using a color like turquoise allows you to work more forcefully and prevents you from creating a piece that is too heavily shaded and muddy. I would always absolutely avoid choosing black to add shade or depth when working in colour.
This is another wonderful feature of Promarkers, it allows you to lift dry color and blend by simply working on top of previously used colors ( I chose Salmon ), so I can switch back for a moment and choose a lighter tone.
Choosing an earthy tone such as Cocoa, use the bullet tip of your pen to further enhance those deep, dark areas, work carefully and mindfully, always referring back to your photograph and remembering to use dark tones sparingly.
Tip. Keep all of the colours you have used so far next to your work, now chop and change between them, adding and refining your work as you go.
Can you picture picking that gorgeous bloom off your page when you look at it from a distance? If so, it is time to stop and create some leaves surrounding your rose and add some beautiful greens to make that rose’ Pop’.
Conclusion
I have given you a step by step guide to drawing a rose and then adding shade, colour and tone. No matter what level you feel like at, I hope you find this to be helpful and inspiring. Keep practicing and the more you draw a rose the easier it will become.
Please leave a comment below if you have any questions.
Join me in my next article where I will guide you through drawing and adding colour to the leaves of a rose bush. I’ll demonstrate how to create a beautiful repeat design inspired by a summer rose garden, showing you how to add sepals and thorns, and draw branches.
Share with your friends! WhatsAppShare on FacebookFlipboard